# Outbound Calling Using the GHL Customer Care Mobile App

> Discover how to use the GHL Customer Care mobile app to make outbound calls. Learn about advanced features such as taking notes, scheduling follow-ups and more!

- Source: https://docs.ghlcustomercare.com/docs/mobile-and-desktop-app/mobile-app/outbound-calling-using-the-ghl-customer-care-mobile-app
- Section: Mobile & Desktop App / Mobile App
- Reading time: 5 min
- Images: 12, each explained below
- Modified on Fri, 20 Jun, 2025 at 3:53 PM

---
The mobile calling experience goes beyond just “Hello.” Whether you’re speaking to a lead, a client, or a teammate, everything you need to take action is now just a tap away. From scheduling follow-ups to logging call outcomes, the Mobile App puts your workflows where they matter most: right on the call screen.

For a full overview of available mobile features, visit Mobile Apps Overview.

---

**TABLE OF CONTENTS**

-   [Overview of Outbound Calling Using the GHL Customer Care Mobile App](#overview-of-outbound-calling-using-the-ghl-customer-care-mobile-app)
-   [Key Benefits of Outbound Calling in the GHL Customer Care Mobile App](#key-benefits-of-outbound-calling-in-the-ghl-customer-care-mobile-app)
-   [Advanced Features Available During a Call on the GHL Customer Care Mobile App](#advanced-features-available-during-a-call-on-the-ghl-customer-care-mobile-app)
-   [Advanced Features Available After a Call on the GHL Customer Care Mobile App](#advanced-features-available-after-a-call-on-the-ghl-customer-care-mobile-app)
-   [How to Make Outbound Calls Using the GHL Customer Care Mobile App](#how-to-make-outbound-calls-using-the-ghl-customer-care-mobile-app)
    -   [Placing Outbound Calls with GHL Customer Care Through Your Phone's Native Calling App](#placing-outbound-calls-with-ghl-customer-care-through-your-phones-native-calling-app)
    -   [Placing Outbound Calls Within the GHL Customer Care Mobile App](#placing-outbound-calls-within-the-ghl-customer-care-mobile-app)
-   [Frequently Asked Questions](#frequently-asked-questions)
-   [Related Articles](#related-articles)

---

# **Overview of Outbound Calling Using the GHL Customer Care Mobile App**

With GHL Customer Care’s mobile call feature, your smartphone becomes a central hub for communication and productivity. Beyond making calls, the app enables you to handle tasks, add notes, and schedule follow-ups instantly without switching screens or losing focus during conversations. The mobile app uses the same phone system as your GHL Customer Care desktop experience, so calls, recordings, and billing are managed seamlessly across both platforms.

---

## **Key Benefits of Outbound Calling in the GHL Customer Care Mobile App**

Mobile calling isn’t just about talking, it’s about acting. This feature helps streamline your workflow, allowing you to manage follow-ups, notes, payments, and more!

-   **Real-time Action:** Eliminate screen switching by scheduling or taking notes mid-call
    
-   **Efficiency:** Save time with embedded task creation tools
    
-   **Customer Experience:** Improve interactions with instant follow-up options
    
-   **Consistency:** Reduce missed tasks or lost context from calls
    
-   **Information Access:** View complete profile and payment information while speaking
    
-   **Flexibility:** Work on the go without sacrificing CRM functionality
    

---

## **Advanced Features Available During a Call on the** **GHL Customer Care Mobile App**

On the in-call screen, you can do much more than just talk. These tools help you take action in real time, keeping everything organized and actionable. 


-   **DND:** Toggle Do Not Disturb for the contact directly from the call
-   **Transfer:** Pass the call to another team member. [Click here to learn more about the Call Transfer feature](https://docs.ghlcustomercare.com/docs/mobile-and-desktop-app/mobile-app/mobile-app-inbound-call-transfer)   
    
-   **Calendars:** Access calendars and schedule a follow-up appointment without leaving the call
-   **Notes:** Type or dictate real-time notes while on the call
-   **Tasks:** Create, manage and view tasks associated with the contact
-   **Payments:** Review or log payments. [Click here to learn more on Payment Hub in the Mobile App](https://docs.ghlcustomercare.com/docs/mobile-and-desktop-app/mobile-payments/consolidated-payment-hub-in-mobile-app)
-   **Profile:** View the contact’s full profile details
-   **Speaker / Mute / Hold / Keypad / End Call:** Standard call controls
    
    
![Step 8 of 8: Speaker / Mute / Hold / Keypad / End Call: Standard call controls](https://s3.amazonaws.com/cdn.freshdesk.com/data/helpdesk/attachments/production/155048501073/original/huzdnifRg97zK7kpHDLM_mX3s8C3VIBgzg.png)

**Step 8 of 8: Speaker / Mute / Hold / Keypad / End Call: Standard call controls**

This screenshot accompanies step 8 of 8 in the "Advanced Features Available During a Call on the GHL Customer Care Mobile App" section of "Outbound Calling Using the GHL Customer Care Mobile App". At this point in the walkthrough you speaker / Mute / Hold / Keypad / End Call: Standard call controls. This part of the guide covers 2 fields, listed below.
- What this covers: Speaker / Mute / Hold / Keypad / End Call: Standard call controls
- Fields: Notes: Type or dictate real-time notes while on the call, Profile: View the contact’s full profile details

Full procedure:

1. DND: Toggle Do Not Disturb for the contact directly from the call
2. Transfer: Pass the call to another team member. Click here to learn more about the Call Transfer feature
3. Calendars: Access calendars and schedule a follow-up appointment without leaving the call
4. Notes: Type or dictate real-time notes while on the call
5. Tasks: Create, manage and view tasks associated with the contact
6. Payments: Review or log payments. Click here to learn more on Payment Hub in the Mobile App
7. Profile: View the contact’s full profile details
8. Speaker / Mute / Hold / Keypad / End Call: Standard call controls  <- this image


---

## **Advanced Features Available After a Call on the GHL Customer Care Mobile App**

Once the call ends, the mobile app presents a summary screen with direct access to post-call actions. This helps ensure nothing falls through the cracks.

-   **Notes:** Finish or edit your in-call notes
    
-   **Calendars:** Schedule any meetings or callbacks
    
-   **Tasks:** Add new follow-ups or action items
-   **Tags:** Apply contact tags to help organize leads
    
-   **Profile: View the contact’s detailed information**
    
-   **DND / Message / Call Back:** Take immediate next steps with a tap
    
    
![Step 6 of 6: DND / Message / Call Back: Take immediate next steps with a tap](https://s3.amazonaws.com/cdn.freshdesk.com/data/helpdesk/attachments/production/155048637679/original/_Febsgi1L434BUMiz5C6lDDHhFPNw-M-iA.png)

**Step 6 of 6: DND / Message / Call Back: Take immediate next steps with a tap**

This screenshot accompanies step 6 of 6 in the "Advanced Features Available After a Call on the GHL Customer Care Mobile App" section of "Outbound Calling Using the GHL Customer Care Mobile App". At this point in the walkthrough you DND / Message / Call Back: Take immediate next steps with a tap. This part of the guide covers 5 fields, listed below.
- What to click: DND / Message / Call Back: Take immediate next steps with a tap
- Fields: Notes: Finish or edit your in-call notes, Calendars: Schedule any meetings or callbacks, Tasks: Add new follow-ups or action items, Tags: Apply contact tags to help organize leads, Profile: View the contact’s detailed information

Example values (illustrative, not read from the screenshot):

- Tags: Apply contact tags to help organize leads: new-patient, referral

Full procedure:

1. Notes: Finish or edit your in-call notes
2. Calendars: Schedule any meetings or callbacks
3. Tasks: Add new follow-ups or action items
4. Tags: Apply contact tags to help organize leads
5. Profile: View the contact’s detailed information
6. DND / Message / Call Back: Take immediate next steps with a tap  <- this image


---

## **How to Make Outbound Calls Using the GHL Customer Care Mobile App**

You can make outbound calls using either through the GHL Customer Care Mobile App or through your phone's native call functionality. This flexibility allows you to stay connected from wherever you're working. There are multiple methods to place an outbound call, allowing you to chose the option that best fits your workflow.

### **Placing Outbound Calls with GHL Customer Care Through Your Phone's Native Calling App**

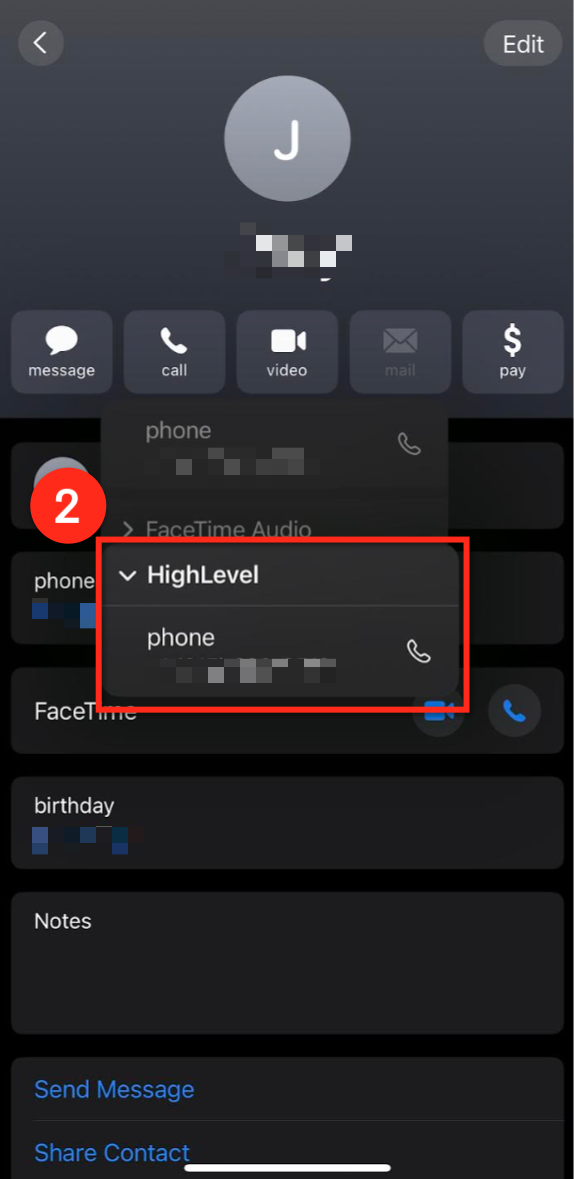
After installing the mobile app, you can also use it to call contacts saved directly in your phone:

1.  Open your phone’s **Contacts** app. **Press and hold** the call button.
    
2.  When prompted, select **GHL Customer Care** or **LeadConnector** from the call method options to place the call
    

<table class="fr-no-borders" style="width: 100%"><tbody><tr><td style="width: 34.1226%"><p>
![Placing Outbound Calls with GHL Customer Care Through Your Phone's Native Calling App (image 3 of 12)](https://s3.amazonaws.com/cdn.freshdesk.com/data/helpdesk/attachments/production/155048637457/original/O18Nv3rehz_qXNWNIhPyMjYF_YqwPVsFgA.png)

**Placing Outbound Calls with GHL Customer Care Through Your Phone's Native Calling App (image 3 of 12)**

This screenshot appears in the "Placing Outbound Calls with GHL Customer Care Through Your Phone's Native Calling App" section of "Outbound Calling Using the GHL Customer Care Mobile App". The text alongside this image reads: Open your phone’s Contacts app. Press and hold the call button. When prompted, select GHL Customer Care or LeadConnector from the call method options to place the call. Immediately after, the guide continues: Navigate to the Conversations tab using the bottom navigation ribbon Locate the conversation with the contact you would like to call and click on the conversation to open it. Tap the Call button in the upper right corner of the screen.
- Where to go: Open your phone’s Contacts app. Press and hold the call button. When prompted, select GHL Customer Care or LeadConnector from the call method options to place the call
- Controls: Contacts, Press and hold, GHL Customer Care, LeadConnector
- Next: Navigate to the Conversations tab using the bottom navigation ribbon Locate the conversation with the contact you would like to call and click on the conversation to open it. Tap the Call button in the upper right corner of the screen.

Full procedure:

1. Open your phone’s Contacts app. Press and hold the call button.
2. When prompted, select GHL Customer Care or LeadConnector from the call method options to place the call
</p></td><td style="width: 65.8774%"><p>
![Placing Outbound Calls with GHL Customer Care Through Your Phone's Native Calling App (image 4 of 12)](https://s3.amazonaws.com/cdn.freshdesk.com/data/helpdesk/attachments/production/155048637550/original/mI2Al8fmR9rwqhp6Fr9HEvDyAfTMfKul8w.png)

**Placing Outbound Calls with GHL Customer Care Through Your Phone's Native Calling App (image 4 of 12)**

This screenshot appears in the "Placing Outbound Calls with GHL Customer Care Through Your Phone's Native Calling App" section of "Outbound Calling Using the GHL Customer Care Mobile App". The text alongside this image reads: Open your phone’s Contacts app. Press and hold the call button. When prompted, select GHL Customer Care or LeadConnector from the call method options to place the call. Immediately after, the guide continues: Navigate to the Conversations tab using the bottom navigation ribbon Locate the conversation with the contact you would like to call and click on the conversation to open it. Tap the Call button in the upper right corner of the screen.
- Where to go: Open your phone’s Contacts app. Press and hold the call button. When prompted, select GHL Customer Care or LeadConnector from the call method options to place the call
- Controls: Contacts, Press and hold, GHL Customer Care, LeadConnector
- Next: Navigate to the Conversations tab using the bottom navigation ribbon Locate the conversation with the contact you would like to call and click on the conversation to open it. Tap the Call button in the upper right corner of the screen.

Full procedure:

1. Open your phone’s Contacts app. Press and hold the call button.
2. When prompted, select GHL Customer Care or LeadConnector from the call method options to place the call
</p></td></tr></tbody></table>

### **Placing Outbound Calls Within the GHL Customer Care Mobile App**

#### **From an Existing Conversation:**

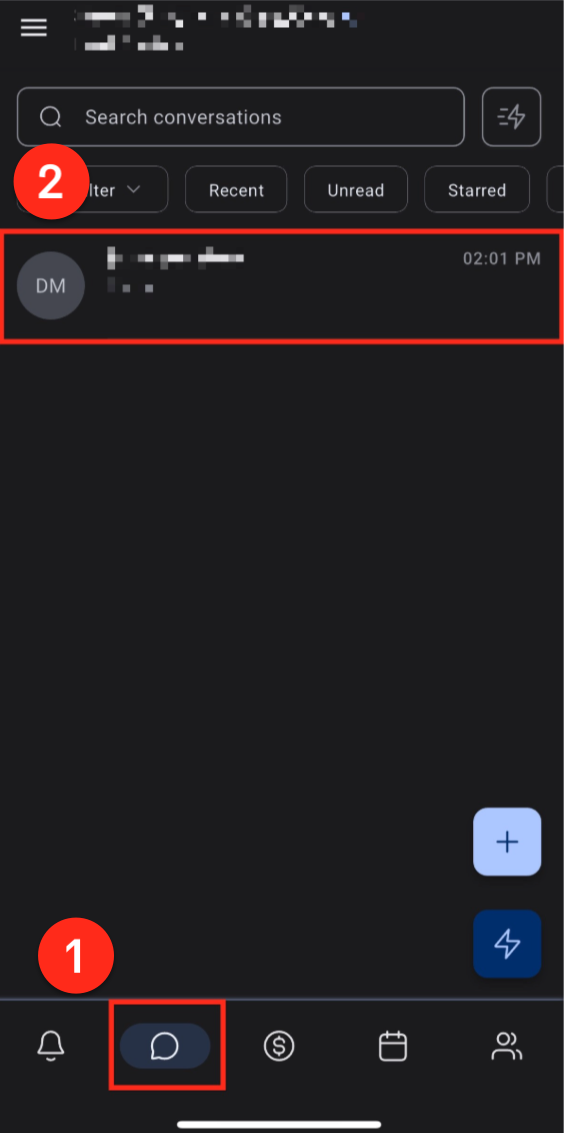
1.  Navigate to the Conversations tab using the bottom navigation ribbon
2.  Locate the conversation with the contact you would like to call and click on the conversation to open it.
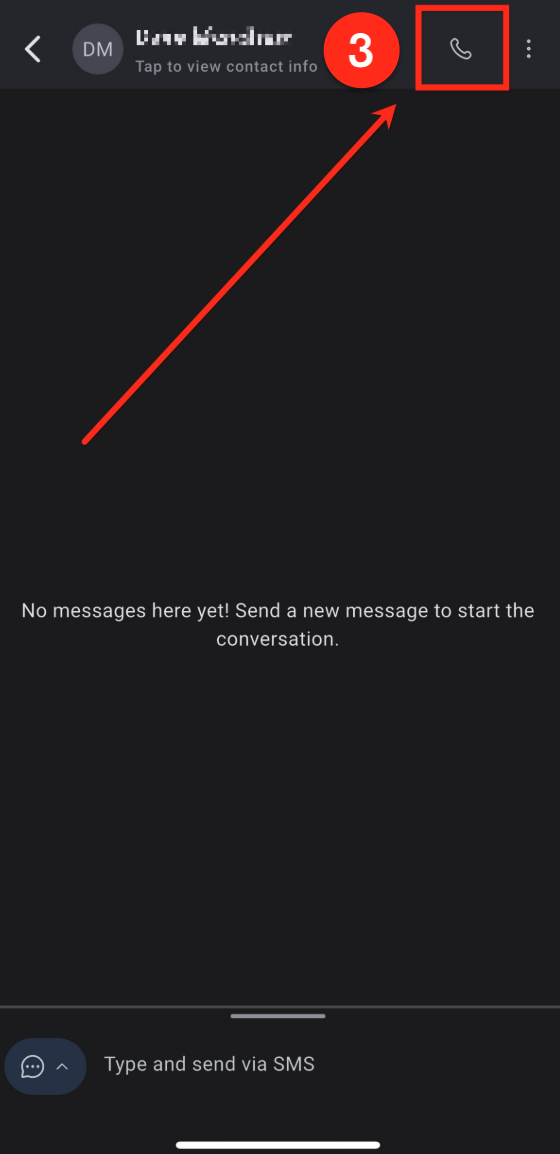
3.  Tap the Call button in the upper right corner of the screen.

<table class="fr-no-borders" style="width: 100%"><tbody><tr><td style="width: 34.1922%"><p>
![From an Existing Conversation: (image 5 of 12)](https://s3.amazonaws.com/cdn.freshdesk.com/data/helpdesk/attachments/production/155048505571/original/DK9aEoSdwZLnclEPx-sQ7fz4vuEGXQspmQ.png)

**From an Existing Conversation: (image 5 of 12)**

This screenshot appears in the "From an Existing Conversation:" section of "Outbound Calling Using the GHL Customer Care Mobile App". The text alongside this image reads: Navigate to the Conversations tab using the bottom navigation ribbon Locate the conversation with the contact you would like to call and click on the conversation to open it. Tap the Call button in the upper right corner of the screen. Immediately after, the guide continues: Navigate to the Contacts tab using the bottom navigation ribbon Select the desired contact to open the contact page Tap the Call button to place a call.
- Where to go: Navigate to the Conversations tab using the bottom navigation ribbon Locate the conversation with the contact you would like to call and click on the conversation to open it. Tap the Call button in the upper right corner of the screen.
- Next: Navigate to the Contacts tab using the bottom navigation ribbon Select the desired contact to open the contact page Tap the Call button to place a call

Full procedure:

1. Navigate to the Conversations tab using the bottom navigation ribbon
2. Locate the conversation with the contact you would like to call and click on the conversation to open it.
3. Tap the Call button in the upper right corner of the screen.
</p></td><td style="width: 65.8078%"><p>
![From an Existing Conversation: (image 6 of 12)](https://s3.amazonaws.com/cdn.freshdesk.com/data/helpdesk/attachments/production/155048505603/original/YKkyTgVe6t-1FHLlS14-zaEboGFf72QOig.png)

**From an Existing Conversation: (image 6 of 12)**

This screenshot appears in the "From an Existing Conversation:" section of "Outbound Calling Using the GHL Customer Care Mobile App". The text alongside this image reads: Navigate to the Conversations tab using the bottom navigation ribbon Locate the conversation with the contact you would like to call and click on the conversation to open it. Tap the Call button in the upper right corner of the screen. Immediately after, the guide continues: Navigate to the Contacts tab using the bottom navigation ribbon Select the desired contact to open the contact page Tap the Call button to place a call.
- Where to go: Navigate to the Conversations tab using the bottom navigation ribbon Locate the conversation with the contact you would like to call and click on the conversation to open it. Tap the Call button in the upper right corner of the screen.
- Next: Navigate to the Contacts tab using the bottom navigation ribbon Select the desired contact to open the contact page Tap the Call button to place a call

Full procedure:

1. Navigate to the Conversations tab using the bottom navigation ribbon
2. Locate the conversation with the contact you would like to call and click on the conversation to open it.
3. Tap the Call button in the upper right corner of the screen.
</p></td></tr></tbody></table>

#### **From an Existing Contact:**

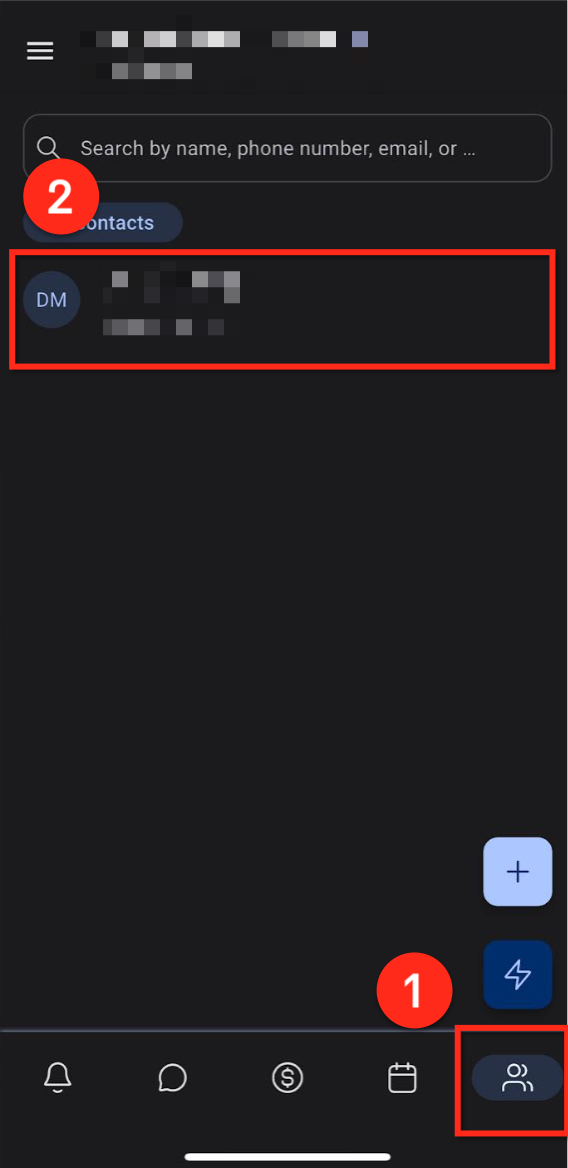
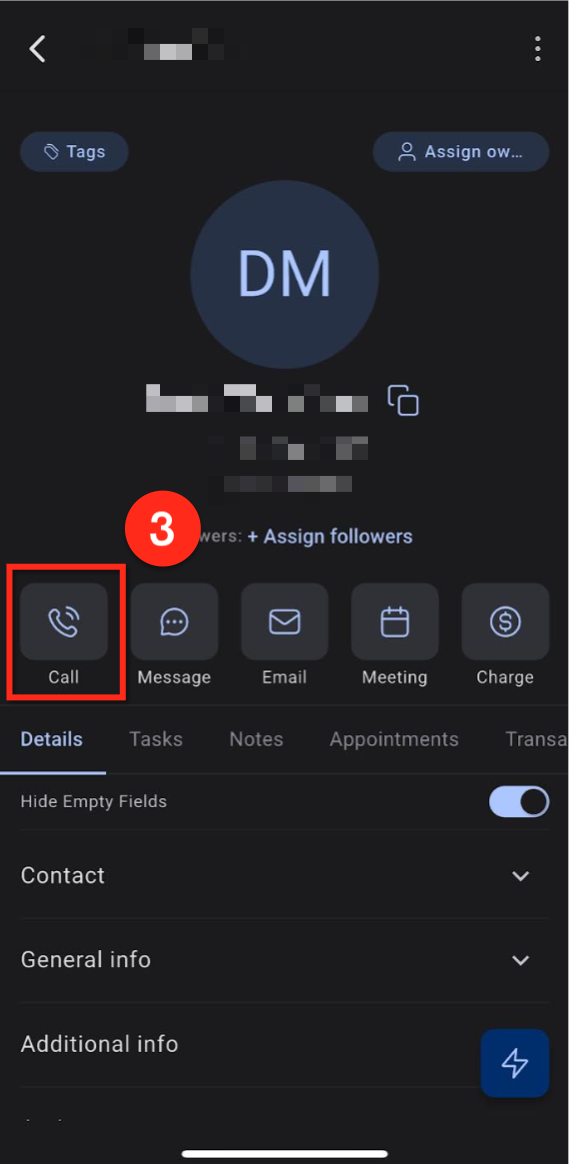
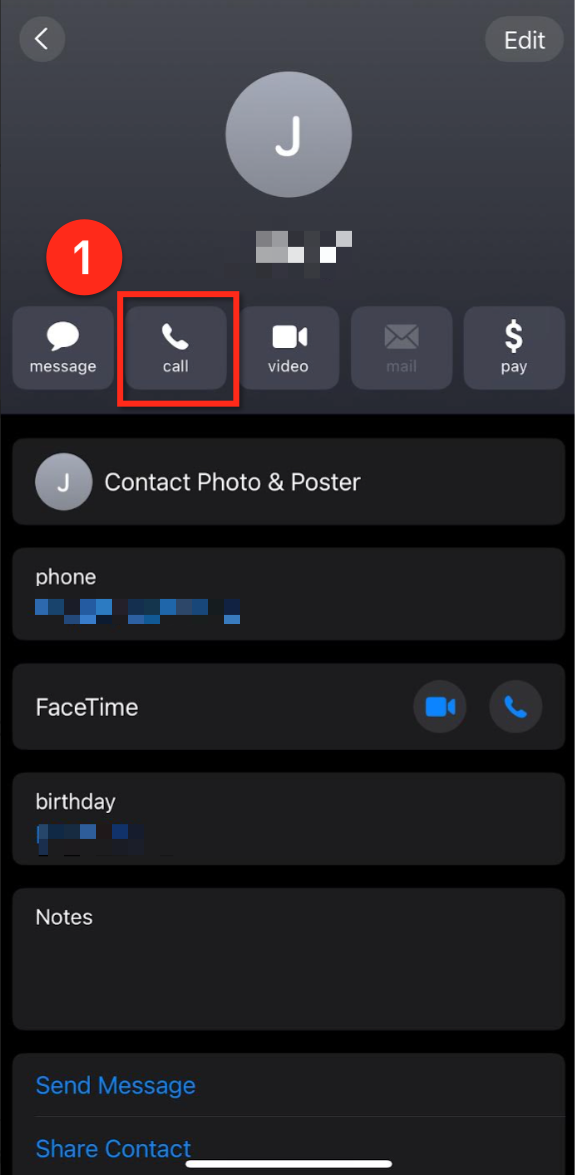
1.  Navigate to the Contacts tab using the bottom navigation ribbon
2.  Select the desired contact to open the contact page
3.  Tap the Call button to place a call

<table class="fr-no-borders" style="width: 100%"><tbody><tr><td style="width: 34.1226%"><p>
![From an Existing Contact: (image 7 of 12)](https://s3.amazonaws.com/cdn.freshdesk.com/data/helpdesk/attachments/production/155048636708/original/4rWoag9XwG5Dn9_agFtOtspXgaUd6SePog.png)

**From an Existing Contact: (image 7 of 12)**

This screenshot appears in the "From an Existing Contact:" section of "Outbound Calling Using the GHL Customer Care Mobile App". The text alongside this image reads: Navigate to the Contacts tab using the bottom navigation ribbon Select the desired contact to open the contact page Tap the Call button to place a call. Immediately after, the guide continues: Tap the Lightning icon in the bottom-right corner of the screen. Select the "Make a Call" option in the lower-left corner in order to place a call.
- Where to go: Navigate to the Contacts tab using the bottom navigation ribbon Select the desired contact to open the contact page Tap the Call button to place a call
- Next: Tap the Lightning icon in the bottom-right corner of the screen. Select the "Make a Call" option in the lower-left corner in order to place a call.

Full procedure:

1. Navigate to the Contacts tab using the bottom navigation ribbon
2. Select the desired contact to open the contact page
3. Tap the Call button to place a call
</p></td><td style="width: 65.8774%"><p>
![From an Existing Contact: (image 8 of 12)](https://s3.amazonaws.com/cdn.freshdesk.com/data/helpdesk/attachments/production/155048636806/original/vDHEHiiUGkB386F2rzfPpVEO5TZErxc6PQ.png)

**From an Existing Contact: (image 8 of 12)**

This screenshot appears in the "From an Existing Contact:" section of "Outbound Calling Using the GHL Customer Care Mobile App". The text alongside this image reads: Navigate to the Contacts tab using the bottom navigation ribbon Select the desired contact to open the contact page Tap the Call button to place a call. Immediately after, the guide continues: Tap the Lightning icon in the bottom-right corner of the screen. Select the "Make a Call" option in the lower-left corner in order to place a call.
- Where to go: Navigate to the Contacts tab using the bottom navigation ribbon Select the desired contact to open the contact page Tap the Call button to place a call
- Next: Tap the Lightning icon in the bottom-right corner of the screen. Select the "Make a Call" option in the lower-left corner in order to place a call.

Full procedure:

1. Navigate to the Contacts tab using the bottom navigation ribbon
2. Select the desired contact to open the contact page
3. Tap the Call button to place a call
</p></td></tr></tbody></table>

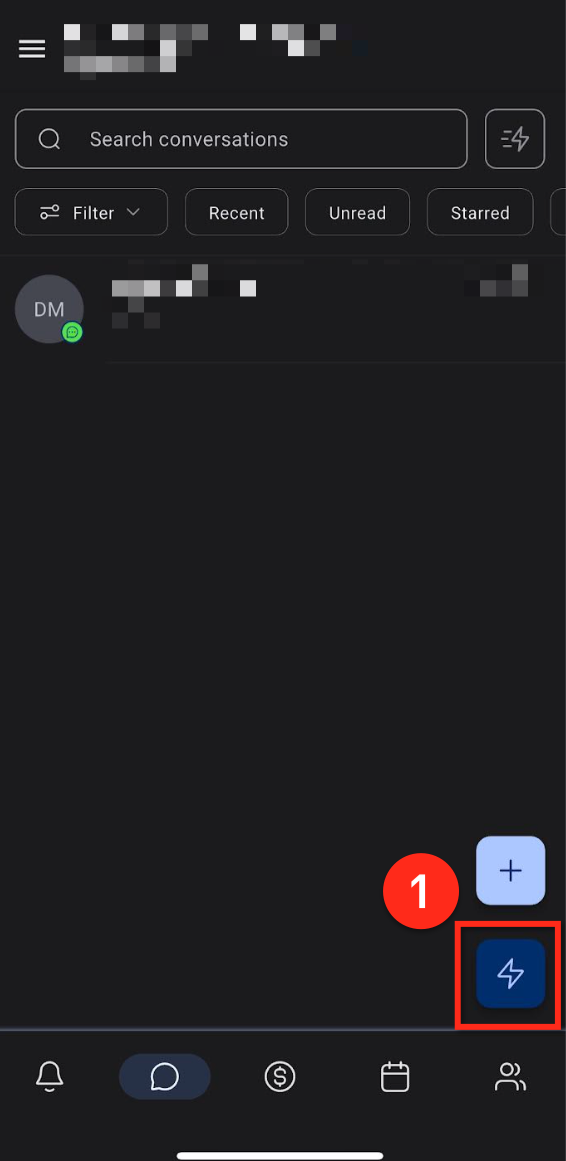
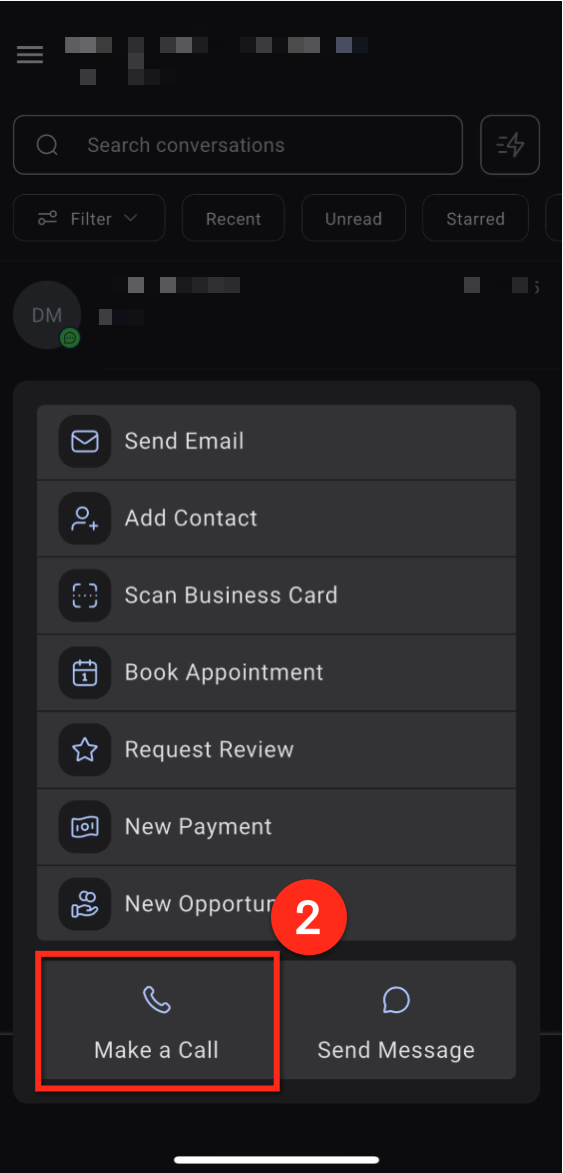
#### **Using the Floating Lightnin****g** **Button:**

1.  Tap the Lightning  icon in the bottom-right corner of the screen.
2.  Select the "Make a Call" option in the lower-left corner in order to place a call.

<table class="fr-no-borders" style="width: 100%"><tbody><tr><td style="width: 34.1226%"><p>
![Using the Floating Lightning Button: (image 9 of 12)](https://s3.amazonaws.com/cdn.freshdesk.com/data/helpdesk/attachments/production/155048637042/original/ZSJJYOlYiZ2JMk2gyDrfxNUi78BS9bGqtg.png)

**Using the Floating Lightning Button: (image 9 of 12)**

This screenshot appears in the "Using the Floating Lightning Button:" section of "Outbound Calling Using the GHL Customer Care Mobile App". The text alongside this image reads: Tap the Lightning icon in the bottom-right corner of the screen. Select the "Make a Call" option in the lower-left corner in order to place a call. Immediately after, the guide continues: From the Notifications tab, select the phone button in the lower right-hand corner This will bring you to the call dialer screen. Enter a phone number here to place an outbound call.
- What to choose: Tap the Lightning icon in the bottom-right corner of the screen. Select the "Make a Call" option in the lower-left corner in order to place a call.
- Next: From the Notifications tab, select the phone button in the lower right-hand corner This will bring you to the call dialer screen. Enter a phone number here to place an outbound call

Full procedure:

1. Tap the Lightning icon in the bottom-right corner of the screen.
2. Select the "Make a Call" option in the lower-left corner in order to place a call.
</p></td><td style="width: 65.8774%"><p>
![Using the Floating Lightning Button: (image 10 of 12)](https://s3.amazonaws.com/cdn.freshdesk.com/data/helpdesk/attachments/production/155048637215/original/h4wp4tOPhP2yPhLrYynivYqN8h0Qq3GHMA.png)

**Using the Floating Lightning Button: (image 10 of 12)**

This screenshot appears in the "Using the Floating Lightning Button:" section of "Outbound Calling Using the GHL Customer Care Mobile App". The text alongside this image reads: Tap the Lightning icon in the bottom-right corner of the screen. Select the "Make a Call" option in the lower-left corner in order to place a call. Immediately after, the guide continues: From the Notifications tab, select the phone button in the lower right-hand corner This will bring you to the call dialer screen. Enter a phone number here to place an outbound call.
- What to choose: Tap the Lightning icon in the bottom-right corner of the screen. Select the "Make a Call" option in the lower-left corner in order to place a call.
- Next: From the Notifications tab, select the phone button in the lower right-hand corner This will bring you to the call dialer screen. Enter a phone number here to place an outbound call

Full procedure:

1. Tap the Lightning icon in the bottom-right corner of the screen.
2. Select the "Make a Call" option in the lower-left corner in order to place a call.
</p></td></tr></tbody></table>

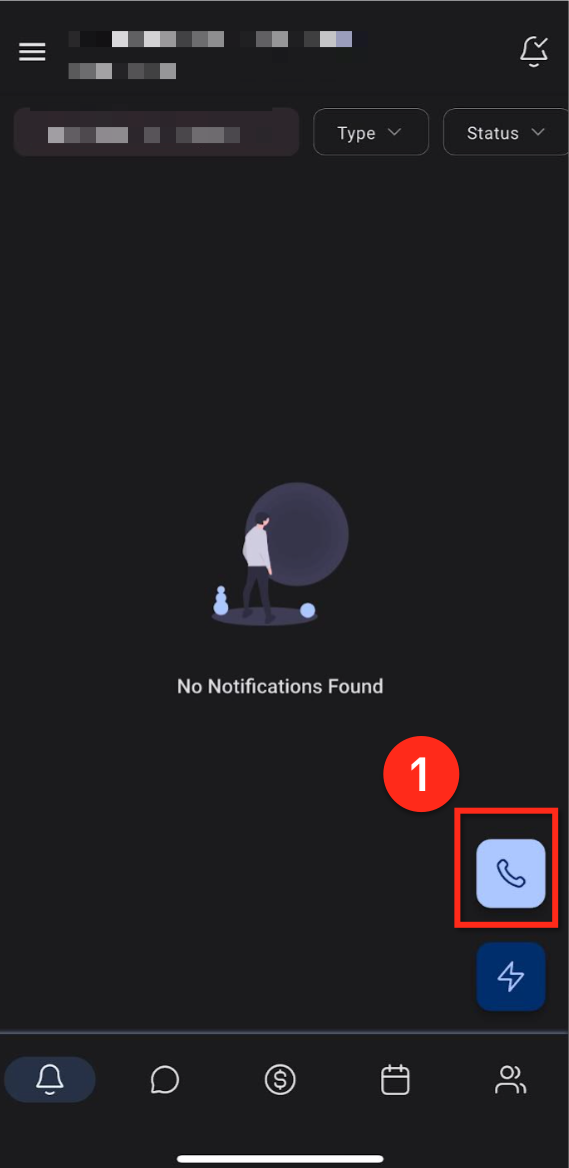
#### **Using the Floating Phone****Button:**

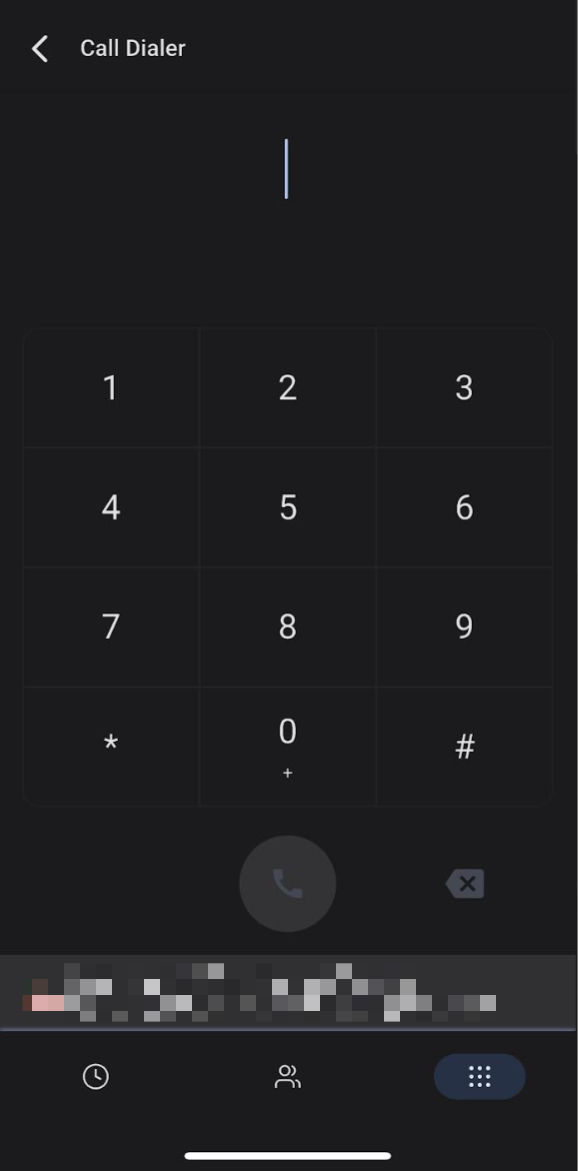
1.  From the Notifications tab, select the phone button in the lower right-hand corner
2.  This will bring you to the call dialer screen. Enter a phone number here to place an outbound call

<table class="fr-no-borders" style="width: 100%"><tbody><tr><td style="width: 34.1226%"><p>
![Using the Floating Phone Button: (image 11 of 12)](https://s3.amazonaws.com/cdn.freshdesk.com/data/helpdesk/attachments/production/155048637278/original/uzeW7WNPPzQe5unzgg8I5CZiISwexwUXlQ.png)

**Using the Floating Phone Button: (image 11 of 12)**

This screenshot appears in the "Using the Floating Phone Button:" section of "Outbound Calling Using the GHL Customer Care Mobile App". The text alongside this image reads: From the Notifications tab, select the phone button in the lower right-hand corner This will bring you to the call dialer screen. Enter a phone number here to place an outbound call. Immediately after, the guide continues: Q: Can I transfer a call while using the mobile app? Yes. Use the Transfer button on the call screen to redirect the call to a teammate. Learn more about call transfers.
- What to fill in: From the Notifications tab, select the phone button in the lower right-hand corner This will bring you to the call dialer screen. Enter a phone number here to place an outbound call
- Next: Q: Can I transfer a call while using the mobile app? Yes. Use the Transfer button on the call screen to redirect the call to a teammate. Learn more about call transfers.

Full procedure:

1. From the Notifications tab, select the phone button in the lower right-hand corner
2. This will bring you to the call dialer screen. Enter a phone number here to place an outbound call
</p></td><td style="width: 65.8774%"><p>
![Using the Floating Phone Button: (image 12 of 12)](https://s3.amazonaws.com/cdn.freshdesk.com/data/helpdesk/attachments/production/155048637313/original/MS09SKH5IZzSpgPZUBRa8NCxiMoCiAk2pg.png)

**Using the Floating Phone Button: (image 12 of 12)**

This screenshot appears in the "Using the Floating Phone Button:" section of "Outbound Calling Using the GHL Customer Care Mobile App". The text alongside this image reads: From the Notifications tab, select the phone button in the lower right-hand corner This will bring you to the call dialer screen. Enter a phone number here to place an outbound call. Immediately after, the guide continues: Q: Can I transfer a call while using the mobile app? Yes. Use the Transfer button on the call screen to redirect the call to a teammate. Learn more about call transfers.
- What to fill in: From the Notifications tab, select the phone button in the lower right-hand corner This will bring you to the call dialer screen. Enter a phone number here to place an outbound call
- Next: Q: Can I transfer a call while using the mobile app? Yes. Use the Transfer button on the call screen to redirect the call to a teammate. Learn more about call transfers.

Full procedure:

1. From the Notifications tab, select the phone button in the lower right-hand corner
2. This will bring you to the call dialer screen. Enter a phone number here to place an outbound call
</p></td></tr></tbody></table>

---

## **Frequently Asked Questions**

**Q: Can I transfer a call while using the mobile app?**  
Yes. Use the Transfer button on the call screen to redirect the call to a teammate. [Learn more about call transfers](https://docs.ghlcustomercare.com/docs/mobile-and-desktop-app/mobile-app/mobile-app-inbound-call-transfer).

**Q: Where do my in-call notes get saved?**  
They are saved under the contact’s record in your CRM for easy follow-up.

**Q: How are spam calls handled in the mobile app?**  
The app automatically flags known or suspected spam callers. These calls will appear with a spam label to help you avoid answering unwanted calls. [Learn more about spam tagging](https://docs.ghlcustomercare.com/docs/mobile-and-desktop-app/mobile-app/spam-tagging-on-mobile).

**Q: What happens if I miss a call?**  
If a voicemail is set up, the contact can leave a message. Learn more on setting up voicemail. You can also set up call routing to ensure calls reach your mobile app. [Learn more on forwarding calls to mobile app](https://docs.ghlcustomercare.com/docs/phone-system/calling/how-to-forward-inbound-calls-to-mobile-app).

**Q: How is mobile calling priced in GHL Customer Care?**  
Calls made through the mobile app are billed based on your Twilio or GHL Customer Care phone system usage. This includes outbound and inbound minutes, which are tracked in your account. [Learn more about LC Phone System pricing](https://docs.ghlcustomercare.com/docs/phone-system/lc-phone-system/phone-system-pricing-billing-guide).

---

## **Related Articles**

-   [](https://docs.ghlcustomercare.com/docs/mobile-and-desktop-app/mobile-app/mobile-app-inbound-call-transfer)Mobile Apps Overview
    
-   [Mobile App - Inbound Call Transfer](https://docs.ghlcustomercare.com/docs/mobile-and-desktop-app/mobile-app/mobile-app-inbound-call-transfer)
    
-   [How to Forward Inbound Calls to Mobile App](https://docs.ghlcustomercare.com/docs/phone-system/calling/how-to-forward-inbound-calls-to-mobile-app)
    
-   [LC Phone Pricing & Billing Guide](https://docs.ghlcustomercare.com/docs/phone-system/lc-phone-system/phone-system-pricing-billing-guide)
    
-   Voicemail for Company and Users
    
-   [Spam Tagging on Mobile](https://docs.ghlcustomercare.com/docs/mobile-and-desktop-app/mobile-app/spam-tagging-on-mobile)
    
-   [Consolidated Payment Hub in Mobile App](https://docs.ghlcustomercare.com/docs/mobile-and-desktop-app/mobile-payments/consolidated-payment-hub-in-mobile-app)

---

Documentation for GHL Customer Care. Support: support@ghlcustomercare.com